Tone(1K)

Film(1K)

Printing(1K)

Data(1K)

<Index>

Zone System

Ansel Adams, American landscape photographer, invented selecting exposure value way, called "Zone system".   It consider the tone to divide 10 steps between black and white (it is called "Zone") on image.

If you consider the system, the luminance scale as the width (step) of Zone, you can image reproduction on a print when take a photo.

Each Zones are determined as following;

Refer to A. ADAMS "The Negative"
Zone Explanations
Zone 0 Maximum density on paper.  It's not the base+fog density, but don't use printing.
Zone I Speed point. here is slight tone, but isn't texture feeling.
Zone II The slight texture feeling density area. deeper tone, description of shadow which needs slightly details in the image.
Zone III General black objects. It is sufficient tone.
Zone IV Typical dark leaf, dark grayed stone, shadow in the landscape. Shadow details of white portraits under daylight.
Zone V Reflection rate 18% gray.  Fair north sky, tanned skin, grayed stone, general lumber which is exposed to the rain.
Zone VI Tone of white's skin under daylight, the cloudy sky, or artificial light.  Light colored stone, shadow on snow in landscapes under daylight, fair sky using light blue filter.
Zone VII Very bright skin, light gray objects.  Typical snow under oblique light.
Zone VIII Description of highlight which needs slightly texture in the image.  Tone of snow, highlight of White skin.
Zone IX White, nearly pure white, no texture feeling but having slight tone similar to Zone I.  Snow which is exposed direct to the sun.
Zone X White of paper base.  Dazzling reflections and gloss in the image.

This grayscale isn't equivalent with the real density, but please put it on your exposure meters, and use it for a help of imaging.

<Front>


Practice of Tone Reproduction

Now I introduce a method that take a real scene, and to demand ISO equivalency speed and developing time by the difference between the part of highest light and the part of deepest shadow in the scene.

Tools and materials

  • Camera (have manual exposure mode)
  • Wide - Standard lens
    (for example, 35mm - 50mm (35mm SLR))
  • 5 - 6 films (same type)
  • A tripod
  • A cable release
  • A Spotmeter or spot mode of TTL meter

samplephoto(11K)

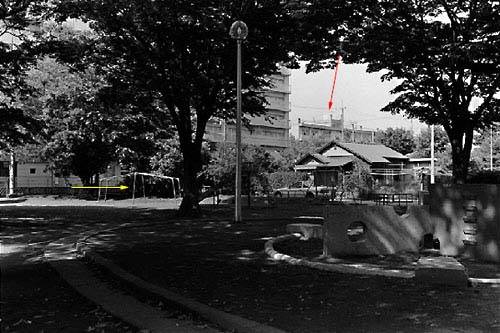
1. Select the area that luminance scale is between 7 steps and 9 steps, and frame a camera as fitting in those area

  • In the right photo, luminance scale is about 7.5 steps from the wood (yellow) to the water tank (red).

2. Set sensitivity of a spotmeter to the ISO sensitivity that is printed in the film package.

3. Select a deepest point which needs slightly details in the object (yellow point in the right photo), after measure that and write down the measurements. (1)

4. Next, select a highest point which needs slightly details in the object (in right pic.,red arrow), measure that and write down the measurements. (2)

5. The difference in the measurements between (1) and (2) is "luminance scale"

6. The point measuring (1) is equal to Zone II.    If luminance scale is about 7 - 9 steps, the difference in neighbor Zone is equal to the difference in exposure value.   Then, it is three stepped down of measurements of (1), and is reproduced as Zone II, because measurements using spotmeter is Zone V (18% gray) reproducing value.(3)

  • For example, if the measurements at process 3 is [1/60,f2.8], you set [1/60,f8.0] on camera.


7. Take 5 cuts of changing the exposure value between over three steps and under one step on the basis of (3)'s value.(+3,+2,+1,N,-1)

8. Repeat before process of 5 - 6 films.


Next : Darkroom Process

Necessary Tools and Chemicals

  • Development tank and reel
  • Developer, stop bath, and fixer
  • Standard tone photographic paper , such as grade 2 or 3
  • Other darkroom goods

Process

9. Three films in the exposed films develop different time.

  • For example, Maker recommended time is 7 min, develop three development time as 5,6,7 min.

  • It is necessary to mark which film is developed which development time.


10. Next, print those negatives.

  • At first, three cuts (+1,N,-1) choice are better. adjust the prints denisty on the basis of highlight (Zone VIII)


11. Compare the those prints.

  • If it is correctly to reproduced Zone II and Zone VIII, the exposure value (or speed) of that cut and development time are able to reproduce the luminance scale.

  • If Zone II part is no toned black, it is over contrast because of development time is too long or exposure value (speed) is too over.   If Zone II is gray, it is lower contrast because of development time is too short or exposure value (speed) is too under.

In these method, you can decide speed and development time to reproduce a luminance scale.

At actual shooting, if the luminance scale is 7 steps, you measure the deeper tone-necessary area using spoymeter, and set the value of three step down of the measurements and shoot, next develop at decided time for 7 step.

<Front>